Showing posts with label goat milk. Show all posts

Thursday, March 7, 2013

Yogurt becomes sublime

With Meggie the goat giving abundant milk, our home is never without yogurt. Our yogurt is made without extra dried milk, stabilizers, gelatin, or other additives. Just milk and starter. It is thinner than the kind you buy, too thin to scoop out of the container. Straining if for a few hours yields thick, creamy, Greek style yogurt, plus whey to feed the animals or bake with.

Every day I cut up fruit for breakfast, spoon on yogurt, and drizzle on honey. And every day I wondered if the honey could be mixed in earlier in the process.

Most honey from the store is pasteurized, but at Several Gardens Farm honey is raw, never heated above body temperature.This allows it to keep all its delicate floral profile,but it crystallizes in our cold house. I got tired of our honey's grittiness and inability to mix well with the yogurt.  It forms sweet, sandy lumps, cloyingly perfumed. I  miss the smooth texture, though not the bland taste, of store bought honey.

So as an experiment I mixed the honey in with the milk before I made the yogurt. I also tried a batch of chocolate yogurt. I wasn't sure how it would work. Perhaps the enzymes would interfere with thickening?

Who cares. I am always up for trying something.

Recipe - honey yogurt and chocolate yogurt

Ingredients:

2 quarts milk - we use raw goat's milk
1.5 teaspoon yogurt culture, or 1/2 cup cultured yogurt
2 - 4 tablespoons honey, to taste
Chocolate syrup to taste

Directions:

Place the milk in two, one quart mason jars.


Immerse jars in water to their necks in a saucepan large enough to hold them comfortably

Heat gently until the water just boils. Turn heat to low and simmer  until milk temperature is 175

Remove pan from heat. Let cool naturally till milk is 120

For Pete's sake, don't put jars of hot milk into ice water to cool them faster. It will cause them to crack

Yogurt after draining
Stir the honey into one jar - it should taste sweet but not cloying

Stir the chocolate into the other jar - it will taste like hot cocoa

Stir 3/4 t yogurt culture into a a few tablespoons of the milk from one jar. Once it is mixed, stir it into the whole jar.

Repeat with the other jar.

Place lids on jars

Return the jars to the pot with the water. Put the pot containing the jars into a warm oven

My oven's minimum recorded temperature is 150. I have found if you set it between there and zero it will maintain a warm incubation overnight

Leave the milk for 8 hours, at which time it will have thickened into yogurt.

Refrigerate until cold.
The ducks loved this whey

Line a sieve with a double layer of butter muslin, or with a large coffee filter.

Place a bowl underneath to catch the whey, and pour in the yogurt.

Check it every hour, and when it reaches the texture you want, spoon it into a storage container and refrigerate until serving time.

The whey can be used for baking or fed to livestock. This whey could probably serve as a sweetener for lemonade.


Taste Results

Honey yogurt

This is the best yogurt I've ever eaten. It tasted like the angel wings of baby kittens. It tasted like the Moonlight Sonata.


David said it was better than fancy schmancy yogurt from the store.


 Noah exclaimed that it was "fruity... ambrosial... I can taste how good the milk was. I love our goats!"


I could detect flavor notes from the flowers our bees had visited and the grassy orchard where the goats had browsed. It made me think I was outdoors feeling the warm breeze on my skin.

It tasted like a promise fulfilled. Yeah, it was milk and honey like the Good Book makes you think it will taste.

I will be making more soon. Maybe right now.

Chocolate yogurt

Sour and chocolate just don't belong together, especially when they are also sweet. This tasted fermented and abrasive and just nasty. Also, the cocoa solids sank during the yogurt culturing process leaving a pale brown yogurt with dark crud in it.

It looked exactly like something you find in a diaper. In a rare fit of good taste, I chose not to post my only photo of it.

The whey was sour, and looked like old coffee. I was not pleased with this yogurt. It almost made me not want chocolate for a few minutes!

It was that bad.

I will try making it again because I'm not easily deterred. I think the idea is good, I just missed something in the execution. I used the first soluble chocolate product that came to hand. This was a cheap and not very good chocolate syrup. Next time I will use honey and cocoa with a good dose of vanilla.

What I learned

You can make yogurt with flavored milk and get good results. The flavor will carry into the yogurt, though the sourness will modify it in unpredictable ways. The culturing process is not disrupted by adding ingredients.


Curry yogurt

After my first success, I tried again with curry flavors. Same routine, only I tried stirring in 1 tsp of my favorite blend of curry seasonings into a quart of milk. The yogurt turned a lovely, sunshine yellow with darker golden streaks. The flavor was perfect. The rawness that bothers me in turmeric was softened by the long soak in warm milk, leaving a smooth, satiny texture and a spicy but moderated flavor. The thick, creamy texture felt so rich in my mouth!

Also it was gorgeous dolloped on top of cooked greens, much prettier than cooking the curry and yogurt in with them.


Recipe:

Ingredients:

2 bunches spinach or spinach and mustard greens, stems removed
3 T neutral oil or ghee
1 tomato, chopped
1 small hot pepper or to taste, chopped
1 sweet red pepper, cut into strips (optional)
1/4 onion, chopped
salt and cumin to taste
6 oz paneer cheese or halloumi (less conventional but good), cubed into 3/4" dice
Flour for dredging
Curry yogurt from 1 quart of milk

Directions:

Pat cheese dry with paper towels or lint-free napkin
Lightly coat cheese surfaces with flour
Heat 2 T of the oil or ghee in a pan till nearly smoking
Fry the cheese, tossing and turning it to brown without sticking
Remove to a plate and set aside
Heat 4 cups of water to boil, and briefly blanch the greens
Drain, reserving 1 cup of cooking liquid.
Refresh greens with cold water, and squeeze out most of the extra moisture
Chop greens fine or pulse briefly in food processor.
Heat the remaining oil in the pan at medium. Saute onion and optional salt and cumin till onion is limp
Add chopped tomato, greens, optional sweet pepper and hot pepper.
Turn heat to low, and simmer fifteen minutes or till thick
Place greens in a bowl. Top with cheese, and serve with dollops of curry yogurt


What will I try next?

I know this yogurt flavoring technique would work for vanilla and brown sugar, maple syrup, or salted caramel. Could I make ranch dip this way? Or eggnog flavored yogurt? Coffee or Chai tea? Saffron? Maybe taco seasoned dipping yogurt? What, oh what, shall I try next?

Shared on townsend house,Foodie Fridays, wildcrafting-wednesdaysimple-lives-thursday


Saturday, January 12, 2013

Buttermilk: a love story


I knew a lovely woman whom a mutual friend described as having a voice like buttermilk. The sound was husky, scratchy, and raw. I thought he was comparing those qualities to the flavor of buttermilk, but he later explained that the parallel was "you don't like it at first, but it's addictive, and soon nothing else will do."

He might have added that her earthy voice, like buttermilk, is one of those old fashions due for a revival.

Originally buttermilk was related to butter. The farmer would save up cream until she had enough to churn. She would agitate it until the fats formed a golden buttery mass, and the liquid separated out. It might take days to accumulate enough, and the cream would sour. The butter had a "cultured" flavor, the liquid was downright sour.

The sour, low-fat liquid was buttermilk. The farmer might give it to a very thirsty child,or mix it with slops for the pigs, take advantage of its acidity as a souring or leavening agent. It was not considered a gourmet treat on its own.
As time passed, fewer people made their own butter, and those who did used well refrigerated cream  so the resulting liquid was no longer sour. And then, as people do, they started craving that tangy, refreshing beverage they had scorned as waste food when it was abundant. 

Nowadays the buttermilk you buy, and the buttermilk I make at home are made from whole or reduced fat milk. It is inoculated with beneficial cultures to create the sour taste. The butter making process has been left out. 

Recipes:

Buttermilk

1 Quart Milk
1/4 cup cultured buttermilk or 1/4 t buttermilk culture or mesophilic culture

Warm the milk to 30 degrees C (about 90 F)
If using buttermilk, add 1/4 cup milk to the buttermilk, mix them together, then mix the mixture into the milk.
If using culture, sprinkle it over the milk and wait 10 minutes for it to hydrate
Mix the milk thoroughly to incorporate the culture
Cover and let sit at room temperature. The time it takes to thicken will vary with temperature. We keep a cold house in the winter, and it often takes 24 hours or longer. Check. When the milk is thick, tangy and sour, it is buttermilk. Refrigerate until needed.


Buttermilk Pancakes

The acids in buttermilk make it very special for baking. It combines with baking soda to act as a leavener without needing to use baking powder - a flavor I deeply dislike. Its acids act as a tenderizer, so pancakes or other baked goods have a very pleasing mouth feel, as though you'd used extra butter.

Done to a golden brown

1 cup flour
1 cup buttermilk
1 egg
1 T sugar
1/2 t salt
1/2 t baking soda
2 T melted butter

Mix together dry ingredients.

Mix together butter, buttermilk and egg until well blended

Lightly mix wet and dry ingredients. A few lumps are better than an over mixed batter.


Heat a frying pan or griddle on medium high heat. Grease lightly.

Pour out 1/2 cup batter per pancake. Let them cook until they form bubbles that pop leaving holes in the surface. 

Not ready to flip
Big holes that don't close - ready to flip


Flip. Count to thirty and the other side is done. Check the pan often. Too hot and you will burn your pancakes, too cool and they will stick.

I assume you already know how to serve and eat pancakes.


Buttermilk Cucumber Soup

2 Cups buttermilk
2 Cups peeled and seeded cucumbers, finely shredded
1 Clove garlic, finely crushed and chopped and minced
Salt and pepper to taste
1 t olive oil
Borage flowers to garnish

Mix it all but the last two ingredients together. Chill. Serve garnished with borage flowers and drizzled with a tiny bit of good olive oil.

Buttermilk Fruit Smoothie


1 Cup Buttermilk
1 Cup Frozen Strawberries or Blueberries
1 Cup cut up frozen peaches
Sugar or honey to taste

Add to blender in listed order. Blend until smooth. Drink

A smoothie of buttermilk, peaches and blueberries rivals anything you can buy, make or even imagine. 

It tastes like something woodland faeries might eat.


Buttermilk Spoonbread


1 cup cornmeal
1 1/2  cups boiling water
2 T butter
1 1/2 cups buttermilk
2 eggs
1 t salt
1 t baking soda

Heat oven to 375. Grease a 2 quart baking pan or better yet, grease a cast iron skillet.

Cut up butter and toss with cornmeal. Stir in baking soda.

Pour boiling water over cornmeal mixture and stir to break up lumps. Cool for 15 minutes

Beat together eggs, buttermilk and salt.

Gradually add wet ingredients to cornmeal mixture, stirring well to break up lumps.

Bake 45 to 50 minutes. You may drizzle milk or cream over the surface to keep it from getting crispy (but why would you? I love a crispy surface). Spoon it out onto the plate; the texture is between a souffle and cornbread. Serve hot.


Buttermilk Mac n Cheese

Substitute buttermilk for regular milk next time you make home made mac n cheese. You will love it. You can use cheap, not very sharp cheddar and it will still be really sharp.

Buttermilk on its own curdles when heated. Use a starch (cornstarch, a flour roux, tapioca) to thicken. Don't freak when the sauce separates - wait, stir, and soon it will come together again.

Buttermilk also does wonders for mashed potatoes. Substitute it for some or all of the milk and some of the butter. It adds a hint of tanginess and a punch of richness without adding extra fat.

You can just drink buttermilk, too. But I don't think anyone does.

shared on : Homestead Barn Hop, Townsend house, backyard farming connectionWildcrafting Wednesday,Gastronomical sovereigntythe self sufficient home acrefrugal-days-sustainable-wayssimple-lives-thursday


Saturday, December 15, 2012

Goat milker - details and update

UPDATE ALERT: Please note: I've made some comments at the bottom about troubles we've encountered and how to solve them. If you have tried making a milker and it isn't working check there first.

From responses I got to the post on our new goat milker, as well as personal correspondence, it's clear that there is a real need for a low cost, low-ish tech, off-grid compatible alternative to hand milking goats. While there are a variety of options you can buy online, most are expensive - more expensive than they need to be.

Not only that, but most of us are makers and aren't looking for an off the shelf solution. We don't just want to buy, we want to build, tweak and understand. So here I am following up with my parts list, some pictures of how I assembled it, and most importantly, suggestions for things to try if you want to build up or down from my model. My husband David builds things heavy, solid and indestructible. He likes to reinvent the wheel, so he kept trying to introduce innovations like "let's build a special jar to go with this".

I'm more the quick and dirty improviser. If Mason jars work pretty well, I don't want to go looking for something better. If I already have an item or know where to buy it nearby, I'm apt to go with that instead of searching out or creating something new, even if it's substantially better. You may fall somewhere within this spectrum, or have your own design approach. I just want you to think about how this works and give it a try!

Our beginning parts list:

Everything but a jar and a goat

2 x 3/8" IDx 1/4"MIP  nylon hose barb/MIP adaptor - from the plumbing aisle of the hardware store

It might be in one of these baggies
barb/MIP adaptor

 2 x 1/2  1/4" nylon or brass nuts - also hardware store.

I could only find brass but I have to believe they have nylon ones somewhere.


Anyway it's fun to ask the guy at the shop if he has brass nuts.


4' of 1/4" ID (inner diameter) 3/8" OD tubing - elsewhere in the hardware store in a special area that sold tubing. Tubing is really cheap. Buy extra if you want to experiment. Also consider buying 1' of 3/8 ID tubing, which you can slide over the smaller tubing to help it fit onto bigger fixtures.
Two kinds of tubing and brass nuts

1 x 1/4" barbed T which I got at an aquarium supply store but also probably available at a hardware store


1 x Mason Jar lid and Screw Band
1 x mason jar (not pictured. I am just not photographer enough to try and get a good picture of one. Clear stuff!) anyway you probably know what they look like. It needs to be the same mouth size as your lid.


2 x 60 cc tapered tip syringes from a larger feed supply store (big epoxy paint supply stores may also sell these)


1 x Manual vacuum pump which we ordered online but may be available from an auto parts store as a brake bleeding pump. Ours is already hose clamped onto a length of tubing, and I left it that way for the picture.

1 x 1/4" to 1/2" hose clamp, which turned out to be overkill (it's holding the stem of this pump onto the tube. It would only be needed if you planned to be very rough with your milker. Like swing it around your head rough.)


2 x clamp on valves, from an aquarium supply store. We never actually use these. They came from an aquarium store.


Assembly: 


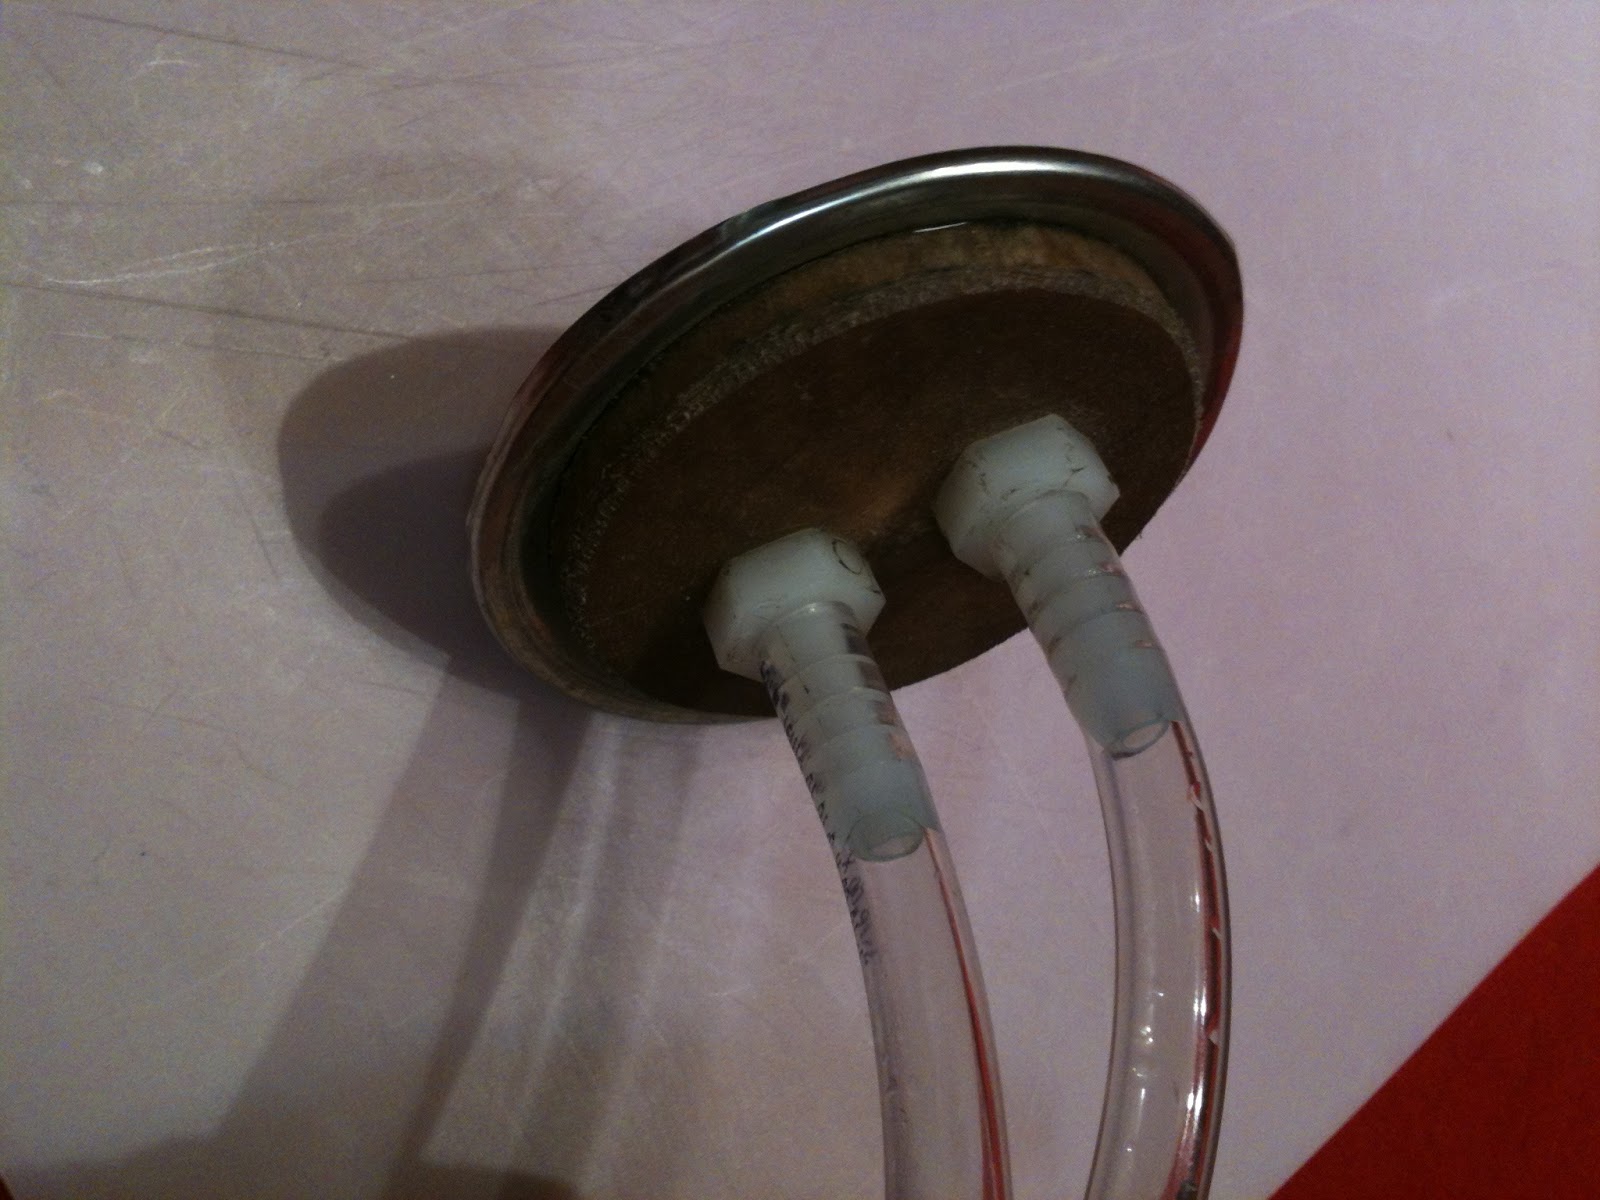
Drill or punch 2 x 1/4" holes in the jar lid. Insert the threaded half of the hose barb/MIP adaptors through the hole, and tighten the  nuts around them. 


You will see in the next picture that we have a wooden support which David added to the lid, thinking it was too weak to handle the pressure of milking. 

But gentle reader, he was wrong. A mason jar lid can take pressure canning, my friend. It would have been just fine without the wooden circle!


Cut two lengths of the 1/4" ID tubing - one 1' long and one 2'. You may shorten them later but I belong to the measure once, cut twice school so I always allow extra length. Dip one end of each piece in boiling water briefly, to soften it enough that is slides easily on to the barb. Work it all the way on. When it cools, it will shrink and hold on tightly.

Using the same boiling water trick, attach the center branch of your T connector to the longer tube. Now cut 2 x 6" lengths out of that last bit of 1/4" tubing and attach them to the other two branches.


Slide the clamps over the tubing. As I might have mentioned, we rarely use them, but with them in place, if you ever want to cut off flow to just one teat, you could. 


Slide the mason jar screw ring over the tubing and join it up to the jar lid, because once you do the next step it will be harder to do that.

Remove and discard the plungers from the syringes. Using the boiling water trick again, wriggle the ends of your 6" tubing onto the tips of the syringes. These are your teat cups!

You are now done except for adding suction. We hose clamped the manual pump to the end of the tube, but in hindsight we didn't have to. The suction will pull the tubing closer all on its own, you just need a tight fit. But yeah, overkill, that's our middle name.


 Now screw the lid onto a jar and go out to the barn! Clean the teat, just like always, but leave it slightly damp. Milk out one squirt on each side into a strip cup, just like always. Then set on the teat cups.The hardest part of the whole operation is holding the teat cups over the teats while you establish suction. I can do it on my own, but the first few times if you can get a buddy, do so. Hold one cup firmly but gently over each teat while pumping the hand pump. It takes me about 15 compressions before milk starts flowing, but before that happens, you should feel the teats get pulled slightly into the cups and you can let go.

Now milk is flowing. If your pump has a gauge, pump to10 and then let it coast down to 6 or 7 and then pump a bit more. If you don't, pump till milk is flowing strongly, then rest till it slows down, etc. When the flow begins to slow even at pressure, stop pumping, let the milk continue to trickle a bit, then break the suction by gently squeezing one teat to let air into the cup. The two cups will fall off. Spray the teats and you're done.


 The most important part of the whole operation is this: you need to stay in touch with the goat. You are no longer hand milking, so you need to even more involved in assessing her udder - is it lumpy? Is it tender or sore? Discolored? I have not had any problems with bruising, mastitis, or anything else really, but I examine and check every single time because I want this to be as positive for the goat as it is for me.

Now - to improvising. 


All you really need are some kind of vacuum device (to create low air pressure), tubing, a jar with a sealable lid, and teat cups. None of them have to be special purpose built items.

I experimented with a setup without the nuts and barbs. I used a large nail to punch holes in the lid of a jar, and then  just stuck two pieces of aquarium tubing into the holes so they fit tightly.  When we pumped, it created a vacuum and milked the goat. It was pretty flimsy. Eventually the lid will deform too much to form a seal but so what? A lid might cost twenty cents, so if it only lasts a few months before I need a new one, I'm still doing OK. I could probably reuse lids from canned goods, which you aren't supposed to can with a second time anyway.


I was an idiot not to use Tattler canning jar lids right from the start.

These are heavy, solid plastic lids with rubber gaskets, designed for repeated canning use. Their rigidity makes them perfect in this application. Buy a box of them and can with the rest.
I bought a battery powered food saver pump from the thrift store ($3.99, I couldn't resist). I ended up using it all the time. I like it much better than the hand pump. 
Its orifice was too big for my tubing so I bought some 3/8" ID tubing and, using the boiling water trick, I slid it over the smaller tubing on the pump end. I connect the pump orifice into it and it works great - even easier on my tendons than using the manual pump.


While at the hardware store buying nuts and barbs, I snapped pictures of two other possible pumps: a mattress inflator/deflator that might work on deflation mode, and an automotive pump designed for both filling tires and starting siphons. That would be handy to have around anyway, n'est pas? On the other hand, there is already enough stuff in the world. I encourage you to look for something simple, nearby, and useful in other respects. If you camp, get the mattress pump. Save food? Plump for a food saver pump, etc.


I'm sure there are other things you can tinker with. Today I tried using Turkey Basters as teat cups. This would eliminate one of the specialty shopping trips from the process.

The basters worked reasonably well but are too long and narrow - they made attaching the milking arrangement a bit too awkward.


If anyone wants, I will happily ship you the assembled lid and teat cup part of this system (everything but the pump, the jar and the goat) for a very reasonable fee - contact me! But as much as I'd like the business, I secretly hope you don't take me up on it. I want you to really own this system, and that means owning the process of making it.

April 28 update to this story. We have had trouble with some of our milkers and heard from others who have the same problem. 

If you did everything as directed and it's not working, try using the assembly without the barbs. Stick the ends of the tubes in hot water and squeeze them through the holes in a mason jar lid. If this works, it means you may have a bad fitting hose barb.

Apparently not all Nylon Hose Barbs are created equal. You need to find one with a 5/8" or wider hex nut. This won't be written anywhere on the package, you have to measure. I don't think it's a specification for the hardware as it wouldn't matter in most applications but the extra width is what seals it tightly to the jar. If you can only find the narrower ones you might want to experiement with silicone caulking them around the top. Choose a food grade caulk. Let it dry and wash well before use. 

We've also had better luck with Brass than with Nylon nuts but I don't know if that is because we used the narrower barbs with the nylon nuts.By the time we figured out the barb problem we had used up all the nylon nuts.

One more error, I did not fully describe the barb. I'm going to write out everything on the package:
WATTS Nylon hose barb 
Lead Free
PL-326
Adapter 3/8" ID x 1/4" MIP
10 mm x 8 mm

I found this by trial and error. If you have other products that worked I'd love you to share!!


Shared on: fresh eggs daily, Barn hopsimplejoyfullivingbackyard-farming-connection, Wednesday fresh food linkup, wildcrafting wednesdayssimple lives thursdaysfrugal-days-sustainable-ways

Saturday, December 8, 2012

Goat milking pump

Meggie - before milking
I enjoy the morning and night task of milking. It's always given me a special time with one animal; time to thank her for her abundance and for giving to us.

Meggie in particular is so undemanding. The other goats and the chickens vie for attention; milking is the one time of day she gets my undivided focus.

She is eating, which usually makes goats happy, but she seems to also relish the time spent together.

She is actually more OK with me milking  she was with her own babies after a certain age.


When I milk I do everything I can to keep myself and the goat calm, focused and happy.
I pat the goat, feed her, sing to her, and listen to her tummy gurgle contentedly as I milk.

Doesn't this look more comfortable?
Regardless of how they feel about being milked, it's got to be a relief to a goat to go from a full udder to an empty one. There can be well over a half gallon of milk in there! The pressure and weight are considerable. The goats always walk away from the milk stand lighter and happier.

But my tendons are another matter. After six years of milking , my wrists started to hurt.

I couldn't squeeze water out of a sponge without excruciating pain. My friend Mellow gave me some exercises to help, but I knew the real answer was to give myself a break from the repetitive motion.


When we saw a DIY milker featuring a vacuum pump designed for brake bleeding, we knew we had to try one ourselves. This is a manually powered pump, so I wasn't sure it would reduce the stress on my arms, but if I didn't try it, I was in danger of becoming totally unable to use my hands. So, we got the parts and made one. Here Noah tries it out (with soapy water and food coloring).
Noah pumping soap/food coloring to learn how it works
It was pretty simple. Everything was off the shelf except for the lid to the mason jar, which we had to modify.

Basically, the vacuum pump is connected by a 3/8" tube to the lid of a jar. A second tube connects to a pair of "teat cups", AKA two 60 cc syringes, which fit over Meggie's teats and form an airtight seal. The tubing is connected with aquarium airline connectors.

Milker setup


I was excited to try this system, but I found myself putting it off day after day. Which anyone who knows me will say is odd. Usually I'm someone who can't wait to try a new contraption.

I was having a hard time accepting that this less 'natural' system would be as gentle as my hand milking. Part of me was sure the syringes would either hurt Meggie, or suck her entire udder into them. Or at least, that she would resent me for using a machine for such a personal thing as drawing her milk.

You're squeezing our teats with a what?!?


Neither one happened.With some trepidation, I sprayed teat cleaner on Meggie's udder, wiped her clean, and set up the contraption.

 I placed the cups on her teats, awkwardly holding them in place, and pumped the suction up to 10.


The teat only was pulled into the syringe until it formed an airtight seal, but no further. It appeared perfectly comfortable.


                                                                                                                                                                                                                 Meggie went on eating serenely as her milk began to draw down the tubing and into the jar. First a trickle, then a steady stream.

I have said it before.Meggie is the ideal goat. She is productive, calm, cooperative and gentle. I call her bomb proof. But I had expected some kind of reaction to having plastic cups suctioned onto her udder.

Nope. Nada. Nil. She just kept calm and carried on.


I don't think the phrase "kick the bucket" was coined to mean "to die" by accident. After hand milking an animal and having her spill, kick, step in or poop in her milk, a person might be ready to do something extreme.

But in our case, it's surely not Meggie's fault. Meggie's legs occasionally cramp from standing still, and she picks her feet up. Once in a while, she used to put them in the bucket of milk, ruining it. 

With the milking device, this will be a thing of the past. nothing to kick over!


 Another advantage to a milking device like this is, the milk never touches anything but the inside of the tubing and the jar. A barn, no matter what, is a barn. Spiders, straw, goat hair, flies in summer, dust, and you can imagine other things all end up there. Hand milking controls as much of the mess as possible, but the milker gives much more assurance that the milk will be clean. I love that. Even more, I love that once its going, I can step away from the milking process, at least long enough to get a picture of my happy, busily eating goat.


Then I bring the milk inside and put a new lid on the jar. I put the jar in an ice bath, clean the milker, and voila. Another batch of milk. A milker would be especially nice for anyone with a goat who had funny sized teats, or for anyone who, like me, found her hands getting tired from milking. So far, the repetitive movement of pumping the milker has been just fine. And the milk is splendid.