From responses I got to the post on our new goat milker, as well as personal correspondence, it's clear that there is a real need for a low cost, low-ish tech, off-grid compatible alternative to hand milking goats. While there are a variety of options you can buy online, most are expensive - more expensive than they need to be.
Not only that, but most of us are makers and aren't looking for an off the shelf solution. We don't just want to buy, we want to build, tweak and understand. So here I am following up with my parts list, some pictures of how I assembled it, and most importantly, suggestions for things to try if you want to build up or down from my model. My husband David builds things heavy, solid and indestructible. He likes to reinvent the wheel, so he kept trying to introduce innovations like "let's build a special jar to go with this".
I'm more the quick and dirty improviser. If Mason jars work pretty well, I don't want to go looking for something better. If I already have an item or know where to buy it nearby, I'm apt to go with that instead of searching out or creating something new, even if it's substantially better. You may fall somewhere within this spectrum, or have your own design approach. I just want you to think about how this works and give it a try!
Our beginning parts list:
 |
| Everything but a jar and a goat |
2 x 3/8" IDx 1/4"MIP nylon hose barb/MIP adaptor - from the plumbing aisle of the hardware store
 |
| It might be in one of these baggies |
 |
| barb/MIP adaptor |
 2 x
2 x I could only find brass but I have to believe they have nylon ones somewhere.
Anyway it's fun to ask the guy at the shop if he has brass nuts.
4' of 1/4" ID (inner diameter) 3/8" OD tubing - elsewhere in the hardware store in a special area that sold tubing. Tubing is really cheap. Buy extra if you want to experiment. Also consider buying 1' of 3/8 ID tubing, which you can slide over the smaller tubing to help it fit onto bigger fixtures.
 |
| Two kinds of tubing and brass nuts |
1 x 1/4" barbed T which I got at an aquarium supply store but also probably available at a hardware store

1 x Mason Jar lid and Screw Band
1 x mason jar (not pictured. I am just not photographer enough to try and get a good picture of one. Clear stuff!) anyway you probably know what they look like. It needs to be the same mouth size as your lid.

2 x 60 cc tapered tip syringes from a larger feed supply store (big epoxy paint supply stores may also sell these)

1 x Manual vacuum pump which we ordered online but may be available from an auto parts store as a brake bleeding pump. Ours is already hose clamped onto a length of tubing, and I left it that way for the picture.
1 x 1/4" to 1/2" hose clamp, which turned out to be overkill (it's holding the stem of this pump onto the tube. It would only be needed if you planned to be very rough with your milker. Like swing it around your head rough.)

2 x clamp on valves, from an aquarium supply store. We never actually use these. They came from an aquarium store.

Assembly:

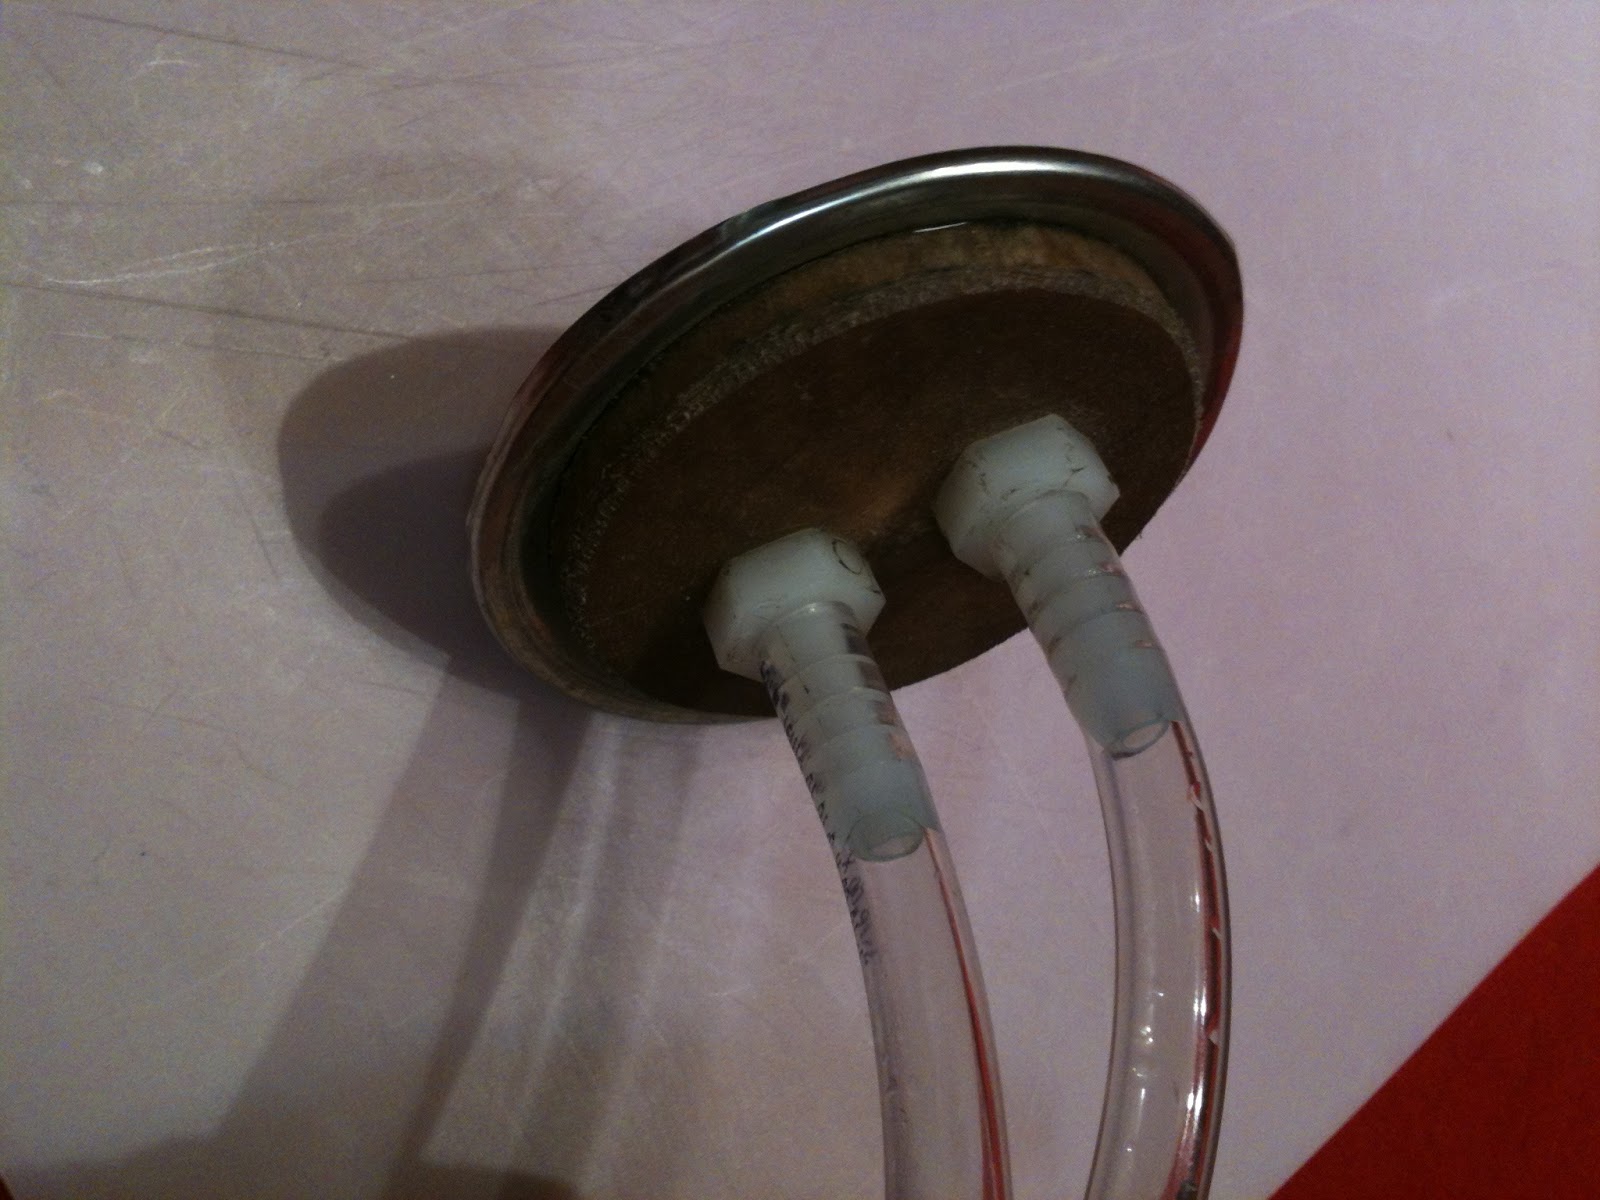
You will see in the next picture that we have a wooden support which David added to the lid, thinking it was too weak to handle the pressure of milking.
But gentle reader, he was wrong. A mason jar lid can take pressure canning, my friend. It would have been just fine without the wooden circle!
Cut two lengths of the 1/4" ID tubing - one 1' long and one 2'. You may shorten them later but I belong to the measure once, cut twice school so I always allow extra length. Dip one end of each piece in boiling water briefly, to soften it enough that is slides easily on to the barb. Work it all the way on. When it cools, it will shrink and hold on tightly.
Using the same boiling water trick, attach the center branch of your T connector to the longer tube. Now cut 2 x 6" lengths out of that last bit of 1/4" tubing and attach them to the other two branches.
Slide the clamps over the tubing. As I might have mentioned, we rarely use them, but with them in place, if you ever want to cut off flow to just one teat, you could.
Slide the mason jar screw ring over the tubing and join it up to the jar lid, because once you do the next step it will be harder to do that.

Remove and discard the plungers from the syringes. Using the boiling water trick again, wriggle the ends of your 6" tubing onto the tips of the syringes. These are your teat cups!
You are now done except for adding suction. We hose clamped the manual pump to the end of the tube, but in hindsight we didn't have to. The suction will pull the tubing closer all on its own, you just need a tight fit. But yeah, overkill, that's our middle name.
 Now milk is flowing. If your pump has a gauge, pump to10 and then let it coast down to 6 or 7 and then pump a bit more. If you don't, pump till milk is flowing strongly, then rest till it slows down, etc. When the flow begins to slow even at pressure, stop pumping, let the milk continue to trickle a bit, then break the suction by gently squeezing one teat to let air into the cup. The two cups will fall off. Spray the teats and you're done.
Now - to improvising.
All you really need are some kind of vacuum device (to create low air pressure), tubing, a jar with a sealable lid, and teat cups. None of them have to be special purpose built items.
I experimented with a setup without the nuts and barbs. I used a large nail to punch holes in the lid of a jar, and then just stuck two pieces of aquarium tubing into the holes so they fit tightly. When we pumped, it created a vacuum and milked the goat. It was pretty flimsy. Eventually the lid will deform too much to form a seal but so what? A lid might cost twenty cents, so if it only lasts a few months before I need a new one, I'm still doing OK. I could probably reuse lids from canned goods, which you aren't supposed to can with a second time anyway.

I was an idiot not to use Tattler canning jar lids right from the start.
These are heavy, solid plastic lids with rubber gaskets, designed for repeated canning use. Their rigidity makes them perfect in this application. Buy a box of them and can with the rest.
 I bought a battery powered food saver pump from the thrift store ($3.99, I couldn't resist). I ended up using it all the time. I like it much better than the hand pump.
 Its orifice was too big for my tubing so I bought some 3/8" ID tubing and, using the boiling water trick, I slid it over the smaller tubing on the pump end. I connect the pump orifice into it and it works great - even easier on my tendons than using the manual pump.

 I'm sure there are other things you can tinker with. Today I tried using Turkey Basters as teat cups. This would eliminate one of the specialty shopping trips from the process.
The basters worked reasonably well but are too long and narrow - they made attaching the milking arrangement a bit too awkward.
If anyone wants, I will happily ship you the assembled lid and teat cup part of this system (everything but the pump, the jar and the goat) for a very reasonable fee - contact me! But as much as I'd like the business, I secretly hope you don't take me up on it. I want you to really own this system, and that means owning the process of making it.
April 28 update to this story. We have had trouble with some of our milkers and heard from others who have the same problem.
If you did everything as directed and it's not working, try using the assembly without the barbs. Stick the ends of the tubes in hot water and squeeze them through the holes in a mason jar lid. If this works, it means you may have a bad fitting hose barb.
Apparently not all Nylon Hose Barbs are created equal. You need to find one with a 5/8" or wider hex nut. This won't be written anywhere on the package, you have to measure. I don't think it's a specification for the hardware as it wouldn't matter in most applications but the extra width is what seals it tightly to the jar. If you can only find the narrower ones you might want to experiement with silicone caulking them around the top. Choose a food grade caulk. Let it dry and wash well before use.
We've also had better luck with Brass than with Nylon nuts but I don't know if that is because we used the narrower barbs with the nylon nuts.By the time we figured out the barb problem we had used up all the nylon nuts.
One more error, I did not fully describe the barb. I'm going to write out everything on the package:
WATTS Nylon hose barb
Lead Free
PL-326
Adapter 3/8" ID x 1/4" MIP
10 mm x 8 mm
I found this by trial and error. If you have other products that worked I'd love you to share!!
Shared on: fresh eggs daily, Barn hop, simplejoyfullivingbackyard-farming-connection, Wednesday fresh food linkup, wildcrafting wednesdays, simple lives thursdays, frugal-days-sustainable-ways
19 comments:
I am really impressed. That innovative milker is just really awesome! Now I need to make one as we are currently milking 6 Saanans and this would be so nice to have and cut down on hand fatigue, too.
Thanks for sharing on Wildcrafting Wednesday.
Chris
This is a FABULOUS milker!!! However, we are very unsuccessful at making the lid (with the barb attachments.) We get no pressure at all. We are in a very rural area and can't even find many of the parts. We would like to buy your lid that you offered for sale. PLEASE tell me how we can order from you, the quicker the better as my doe is in milk and babies need to be weaned, Thanks!! Tina
Tina, if you are comfortable giving me a contact email or similar I will get in touch about a lid. I have a small diameter one ready to go or could make a large mouth one easily.
We have found that not all barb attachments are equally well made and if your hardware store stocks one that doesn't form a good fit it can be really frustrating. I wanted to make some of these as gifts to my goaty friends and seemed to have failure after failure till I figured out where to buy my barbs. Now I'm back up and running.
So please get in contact and I'll shoot you a message.
Sarah
Wow! I was told about your blog and had to check it out. I bought a Reynolds vacuum sealer almost two years ago to use as the pump for the milker. I haven't got mine put together yet, but am working on it. I found 3/8 nylon barbs which includes the nut at US Plastics (http://www.usplastic.com/catalog/item.aspx?itemid=34811&catid=669) I ordered some today...
Hey folks, there are some corrections in the story that may matter a lot if you are building one of these. Please read through. I got the nut size wrong (but it you are like me and try them on in the hardware story you already know that).
And I've learned that some barb ends don't work. Linda, your solution sounds intriguing. Please keep me updated. If that product works it's a boon to us all to have an online source.
Also, a simple way to see if the leak is in the lid apparatus is to put it on a jar, pour a couple teaspoons of water onto the lid, cover the teat cups tightly and run the pump. If there's a leak, you will see the water getting sucked through the crevice and into the jar.
In all my tests the problem is always the barb attachment, never the lid/jar connection. Mason jar lids are well made.
I would imagine the barbs and hose would have to fit very tight. I like the suggestion to test if the barbs are leaking. Great idea!
I first started trying these vacuum milkers in 2009. I actually made 3 of them (varying ways). You can read about them in my blog here: http://lindercroft.wordpress.com/category/diy-hand-milkers/ However, I never really got to use any of them for long. I had a Nigerian Dwarf and I just ended up milking her by hand. However, I want one to work because I no longer want to milk by hand (getting older and milking makes my hands hurt). I don't have any of the ones I made before and didn't write down any information about where I got the parts! Bummer...
I received my barbs and put together a lid just to see how it works. I don't have the tubing I am going to use for the milker, but I did have some that I could experiment with. I drilled the holes in the canning lid and connected the hose barbs, tightened them very tight and added the hoses. Checked the vacuum was pretty weak, so I put water on the top of the lid as you suggested and the water was drawn into the jar by all three barbs. So I am going to to use E600 clear flexible adhesive on the top against the lid and under the lip of the barbs and see what happens. If that doesn't work, I will have to get some round gaskets to add to the bottom just before the nut. I will let you know how it does.
I put together the milker... you can read about it in my blog here: http:http://www.lindercroft.net/1/post/2013/05/just-another-homemade-milking-machine.html
Linda, this is fantastic. Thank you for following up when it worked. I know it sounds silly but I've been in suspense, feeling like if it didn't work I'd have let you down.
Several readers have shared that sealing the lid to the barb with silicone works just fine and meets cleanliness requirements as long as you only seal the outside of the lid. If you're frustrated with the hardware give that a try.
Remember to use a food safe sealant, let it dry full and wash before using.
HI
I made your milking machine. Looks great, however, my goat kidded yesterday, and her tests are so small that we were having trouble getting any quantity of colostrum ... so... I grabbed the Machine to give it a try...it suctioned on...but we couldn't get the milk to flow... poor girl.. she did not like it one bit.
We have tried several times and still no luck.
This was her first pregnancy. And her udder is HUGE... and very very firm... but both kids have latched on & feed regularly now... I just want to be able to relieve the pressure if necessary..
Any help you can provide would be great!!!!
Wow Jenniferlynne. First, congratulations on the kids, and glad they can latch on! It sounds like you aren't planning to milk yet unless you need to? If so, you might try holding back and see if the kids take care of the full udder on their own.
When Meggie kidded we didn't have the machine yet, so I was hand milking, and for the first week I only milked if she looked really lopsided or so tight she was shiny.
So I wish I had more suggestions there.
Regarding the machine - if she's a dwarf or mini, you might want to size down the teat cups to fit her better. I have a standard so the sizes may not be the same. Then I'd try hand milking a few squirts, both to relax her and to make sure she's letting down.
If she's a first freshner you may want to do a bit more than just wipe down her udder. A bit of massage or gentle shaking may help, and washing really well with a warm damp towel. Anything you would normally do to relax and calm a first freshener I would do with the machine just as you would be hand. And squirting out a few squeezes by hand might get her started and then you could use the machine.
There's often a pause with Meggie where the cups are tight on her teats and the milk hasn't started yet. But she's used to it and calm. With a new goat I'd get her milk really flowing before I attached the cups.
I can only reflect on my own experience as a new parent. I was so distracted between all the new things about the baby, and nursing was way more confusing and uncomfortable than I expected. We think goats' intincts will cover all of that but I'm sure as a new mom your doe is still sorting things out.
Good luck with your babies and hope you get the milker going!
Sarah
Thank You SO MUCH Sarah !!
Your quick & thoughtful reply are greatly appreciated....
I think the size cup I'm using is just right...I had ordered two sizes...and I just matched up the best fitting one with Cally's teat. She is a Saanan so, full sized...and not only was this her first kidding, but we almost lost MOM, and both kids... The babies presented in a very UNUSUAL way...we first saw the face of one, no hoofs, and then the hoofs...but they were the hoofs of the TWIN...(only to be discovered upon trying to coax the hoofs out and seeing a second face) It turned out to be more than my other half and I EVER expected for our first kidding...and fortunately we had some absolute guardian angels descend upon our humble little farm and save not only Mom...but both kids...
I know after such a traumatic ordeal, my Cally doesn't need any unnecessary discomfort...so I was really upset that her udder was so firm and we just couldn't relieve it...(now mind you...she is our first goat to kid...our second goat ...Addy, is due any day now as well...) so I'm a little overwhelmed at this point and can only hope that things go A LOT smoother with her delivery...
I will keep my eye on her udder...it doesn't look "SHINY" yet..just really big...and really firm.... and I will let the babies have at her :)
thank you again...for the instructions and for the advice...
I feel very relieved..and now must head back to the goat barn to see the family ...
THANK YOU, THANK YOU...
Jenniferlynne
Hi there Sarah and I would like to lead off with how amazing this little contraption is!
We found your blog post this morning while searching the web for manual goat milkers. When we stumbled across your post we made a beeline for Lowes and found (almost) everything we needed (We found the syringes at a pet store :)). We got home and quickly assembled the contraption and found out at once that it didn't hold pressure.
We have the silicone to go ahead and seal everything up but we didn't have the 24 hours to let it cure as our poor stubborn small teated Nubian/Boer nanny was fit to burst with milk.
As we had to milk her quickly and we weren't terribly worried about saving this batch we employed a quick and dirty temporary seal that worked WONDERFULLY. We pulled out a couple of pieces of chewing gum and started smacking away.
While i'm sure it doesn't meet any sanitation codes I'm hoping that this method will help relieve some poor nannies that were previously unable to be milked.
Btw if you are still doing them I would absolutely love to get in contact with you about lids!
Also might I ask where you are buying the Barb Adapters/Nuts. I'm not finding the right ones at lowes.
Matt, I love the chewing gum solution though as you say, not for milk that will be passing any inspections:)
I found the 'barbs that work' at McClendons hardware. We're in Seattle; don't know where you are or what other places are availble. Getting the right barb seems like the biggest nuisance of the whole project; the wrong one scratches the whole project. The nuts are pretty generally available.
I drove around from store to store with the brass nuts, trying them in the barbs till I got a good fit. I felt like the prince in Cinderella. And I assure you when I found the right one I bought a bunch.
Worst case scenario, get back in touch and I'll send you a couple of them at around cost.
Sarah
I wonder if a breast pump would work, but just finding a way to adjust the attachments to the teat size (like the way we do our breasts) and to keep milk out of certain tubing? I wonder if the adjustable settings with the pump would make it better for milking due to being able to adjust the expression strength and has a massage option on most that could help bring a more comfortable experience? Just a thought, what do you think?
My email is jernigan.morgan98@gmail.com if you want to email me your thoughts! I found y’all on Pinterest so I may not remember to look down here for a response!
Post a Comment